Other Pages

Tuesday, September 30, 2014

Wplus9 - Celebrate Its Your Day


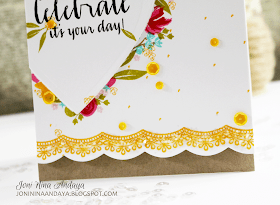
To begin my card I first created a guide using the Stackers: Heart die (largest one) then stamped my images using Pretty PeoniesPretty Little PeoniesFresh Cut Containers, and Little Bits. I then removed the heart guide to reveal the flowers.

For the bottom of the card panel I die-cut using the Scallop border die where I stamped one of the  Chantilly Trim images (you can see below :).


I then die-cut 3 more hearts, cut on the side and adhere on the card panel for elevation. I then stamped the sentiment from Strictly Sentiments 5 and added some flower and leaves from Pretty Little Peonies.


I added some Pretty Pink Posh sequins is Marigold in 4mm & 6mm to finish off the card.


Here's the full view of the card.


I hope you guys enjoyed!


Have a Wonderful Week :)
Thank you for stopping by.


Sunday, September 28, 2014

Waffle Flower Crafts - Reach For The Stars


Hello There, today I am sharing a simple Waffle Flower Crafts card project.
Reach for the Stars...these images are so versatile, this cute image will also work for a baby card :)

The Waffle Flower Crafts Stamp Sets I used are:
Starry Night (sentiments and some stars image)
Riverside (clouds and bunny)
Rock My World (grass image)


To begin my card I cut the panels for my card first. The grey cardstock I adhere on the card base. I then distress the white cardstock panel with Distress Ink in Peacock Feather and a hint of Wild Honey. I then stamped the cloud image, fussy cut, adhere with foam dots, and stamped some stars from Riverside Stamp Set. 


Next, I stamped the bunny from the Riverside Stamp set, colored it with Copics, and fussy cut. I then added the grass image from the Rock My World Stamp Set. To finish off the card I then added the sentiment from the Starry Night.


Here's the full image of the card.


I hope you enjoyed!
To see all the Waffle Flower Crafts products please click HERE.
You can also check out Waffle Flower Crafts Blog for more inspirations.


Thank you so much for stopping by.
Have a Wonderful Week :)


Friday, September 26, 2014

Neat and Tangled - September Release - Day 5


Hello Everyone..,today is the fifth day of the release at Neat & Tangled, I hope you really enjoyed this release. For the final day we are showcasing this cute stamp set called Turkey Talk with its Coordinating Dies.

To begin my card I first cut a panel slightly smaller than an A2 card then cut some strip of Kraft cardstock and adhere on the panel. Next, I splattered it with Mr. Huey Color Mist in Classic Tan and let it dry. Next I stamped, colored the turkey with Copics, and fussy cut. I added some black thread on the panel then adhere the turkey. The sentiment I used was also from the same set, I stamped the bubble talk image on the vellum, white heat embossed, and stamped the sentiment in Versafine Onxy Black then adhere the bubble talk on the panel to finish off the card.


Here's the full image of the card.


I hope you enjoyed this release.

For more inspirations please visit NEAT & TANGLED Blog.

Thank you so much for visiting...
Have a Wonderful weekend!!!

Thursday, September 25, 2014

Neat and Tangled - September Release - Day 4


Hello Everyone....we're back on  Neat & Tangled September Release.
ORIGAMI MAP


In all the release this is my favorite :)
For my card I stamped the map in Versamark ink and white heat embossed. I then watercolored the map first with PTI Simply Chartreuse and Distress ink in Crushed Olive for different variations of green. Once its dried I then colored the panel in Distress ink in Peacock Feather for the ocean.
As for the sentiment I white embossed it in white on a strip of black cardstock to make it pop.


I hope you enjoyed!


Thank you so much for stopping by!
Don't forget to stop by at Neat & Tangled Blog for more inspiration.


Have a Wonderful almost weekend kinda day :)

Wednesday, September 24, 2014

Wplus9 - Watercolored Thank You Card

If you are looking for Neat & Tangled post Day 3 please click HERE.
.................................................................................................................................................


Hello Everyone...I just want to share this simple watercolored card I made for a friend. Ha! I need to make more of this simple to make card....a thanks from the heart. Really easy to make all you need are: watercolor paper I got mine at Michaels, for the watercolor I used Distress Ink in Spun Sugar and Worn Lipstick, sequins from Pretty Pink Posh in Marshmallow 4mm/ 6mm, feather image from Wplus9 Dream Believer stamp set, and for the sentiment Wplus9 Hand Lettered Thanks stamp set.

I first cut my watercolor paper a little bit smaller than an A2 card started watercoloring from the bottom then up.....hehehe you can go either way you want, I just like to start the watercolor at the bottom of my panel first. I then I used the heat tool to dry it really quick, then stamped my sentiment from Hand Lettered Thanks in Versafine Onxy Black ink to really get that dark black. Next, I stamped the feather image from Dream Believer stamped around the watercolor panel, added some sequins and the card was off to my friend.


Here's the full of the card.


I hope you enjoyed this watercolored card.
Thank you so much for stopping by :)

Have Gorgeous Week!


Neat and Tangled - September Release - Day 3


Hello Everyone ....I hope you guys are enjoying the Neat & Tangled September release so far. Today we are showcasing the new My Plate is Full & its coordinating dies. This set is so perfect for the upcoming fall seasons.

To begin my card I stamped "So Thankful For Friend" all over the card base with black ink and splattered it with Heidi Swapp in Gold. I then gold embossed the vellum with Punchinella image and adhere on the card (I used this image as a placemat. Next, I stamped and die-cut the images and adhere on the punchinella image to finish of the card.


I hope you enjoyed!
For more inspiration please stop by at Neat & Tangled Blog for more inspiration.


Thank you so much for stopping by.
Have a Wonderful Week!


Tuesday, September 23, 2014

Neat and Tangled - September Release - Day 2

Hello Everyone..its all about BE FULL today @ Neat and Tangled Blog.

For my card I created a kinda graffiti type of card.
I stamped the big sentiment on the card panel few times with different colors and black on top of all the different color sentiment to make it stand out.

I added some sequins, enamel dots, and wood veneer from Michaels and I am all done.


I hope you guys enjoyed this simple card.
For more inspiration please visit ....


Thank you so much for stopping by!
Have a Gorgeous Day :)


Monday, September 22, 2014

Neat and Tangled - September Release - Day 1


Hello Everyone...this week mark the release of the new products from Neat and Tangled.

Today with are showcasing the new upcoming:
Creepy Cute Stamp Set
Creepy Cute Shadows/Sentiments Stamp Set
Creepy Cute Coordinating Dies


For my card I started folding my A2 card and cut the white panel cardstock a bit smaller than than the A2 card. I then white embossed the cute skull image from the Creep Cute Stamp Set all over the panel. Next I die-cut a circle on the left upper side on the card and started distressing to create some shadow. Next, I then did some ink splatter using Peacock Feather Distress ink + Water on the panel.
I then adhered the panel with foam tape and adhered the fussy cut/colored "skull", "bones", and "bows" from the same set.

To finish off the card I adhere the banner with sentiment using  Creepy Cute Stamp Set and Creepy Cute Shadows/Sentiments Stamp Set.

I did not get to use the Coordinating dies with the images this time because I really want the images without the white borders, but you read it right...N&T have a coordinating dies with this cute images <3.


Here's the full view of the card.


Here's the look of the coordinating dies <3
Awesome right?


I hope you enjoyed!!!
For more inspiration for the upcoming release...please click the link below.


Thank you so much for visiting <3
Have a Wonderful Week!


Sunday, September 21, 2014

Autumn


Hello Everyone....I just want to share with you some of the photos I got on Pinterest.
Oh really....love Autumn when the leaves change colors and when you feel the crisp in the air...I just love everything about it. It still gets warm here in California but I wish I could be in a place where I can really enjoy this season.


Thank you for stoppin' by :)
Have a Happy Day!


Thursday, September 18, 2014

Lawn Fawn - Goodie Bag


Hello Everyone...
I finally got the Goodie Bag Lawn Cuts and the Snow Days Stamp set with Coordinating Lawn Fawn Cuts that I ordered.

Oh..the Goodie bag is so adorable if you have not gotten yours yet.
Lots of uses with this especially for holidays and non-holidays alike.

I made this Goodie Bag for my daughter's friends to give out to her BFFs here is the sample :) I thought I'd share with you....really cute with those bunnies from Snow Days.
This Goodie Bag is really easy to assemble, you can watch the video HERE. I used a white cardstock stamped and die-cut the images (bunnies, tree, & tiny heart) from Snow Days .  I then stamped the sentiment "You Warm My Heart" also from the Snow Days stamp set on a piece of MME cardstock and adhere on the bag. Fill in the bag with chocolates tie in some silver and natural twine on top then I am done.


Here's the full image.


I hope you guys enjoyed this quick project share.


Thank you so much for stopping by :)
Have a Gorgeous almost weekend kinda day.


Wednesday, September 17, 2014

Reverse Confetti & StampNation


Hello there...
Today Reverse Confetti is collaborating with StampNation and we are to create a project using the
StampNation Sketch. Easy with lots of possibilities with this one :)


I can only show you a peek of the card, but you can see the full reveal of my project and the other RC design team projects as well  at the StampNation Website.


StampNation is offering a $1 Trial ( will expire the same day).
Here's the link of the $1 trial HERE.

Here's also the link to the StampNation Website.


I hope you get a chance to check it out :)
Thank you so much for stopping by.
Have a Wonderful day.


Tuesday, September 16, 2014

Waffle Flower - With Joy


Hello...again Everyone :) this is my second post of the day.
If you are looking for the Reverse Confetti September Color Challenge please click HERE.
...........................................................................................................................................................


Today I am sharing another Waffle Flower Crafts project (Shaker Card) incorporating the new
  Be My Guest, Starry Night, and past released Loved stamped sets, perfect for the coming holiday.


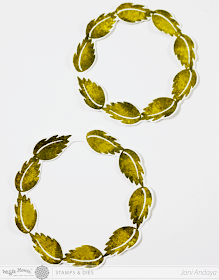
1. To start, I first drew a circle on white cardstock, then stamp the leaf from Loved stamp set to create a wreath using the rock and roll technique, a sample video HERE.


2. Once the wreaths are done, then I cut the shape I created inside and out.
3. I then adhered them together and put it away for the mean time.


4. Next, I cut a panel smaller than the A2 card base I created.
5. Then I stamped the circle image from Starry Night stamp set to create a window for my card.


6. Once window for the panel is done, I then drew a pencil mark using the window panel I created.
7. This will serve as a guide where to adhere the foam tape and stamped the sentiment from Be My Guest (Joy) and Loved (with) stamp sets.
8. Once I finished drawing my guide, I then adhere the clear cardstock behind the window panel.
9. I then fill in the center of the card base with Pretty Pink Posh sequins in Gold, Sparkling Clear in all 3 sizes, Lemon Meringue, and Marshmallow.


10. Next, I adhere the panel on the card base.
11. Then adhere the wreath with foam tape on top of the window panel I created. 


12. Next, I gold embossed the ribbon from Loved stamped set on vellum and die-cut the ribbon image using the coordinating die from Loved stamp set.


Here's the full image.


I hope you guys enjoyed!


Thank you so much for stopping by.
Have a Wonderful day :)


Reverse Confetti - September Color Challenge


 Hello Everyone....
Its time for Color Challenge here at Reverse Confetti Blog.
All about Pink, Grey, and Yellow.


To begin my card I first cut the patterned paper from MME and adhere on the card base.
I then cut another white cardstock a little smaller than an A2 card and spritz some Heidi Swapp in Gold. Next, I die-cut the large and small leaves from Fresh 'n Fruity Confetti Cuts and distress it with Wplus9 Sweet Nectar and Sweet Gelato. The center of the flower is from the new September released Tagged Tote Confetti Cuts, I used the tag reinforcer colored it with Copic markers. Next, I die-cut the leaves from Petals 'n Posies Confetti Cuts and adhere on the card. The sentiment is also from the new September released In A Big Way. To finish of the card I added some flower sequins from Summer Embellishment Kit and Pretty Pink Posh Sparkling Clear sequins in all 3 sizes 4mm, 6mm, and 8mm.


Here's the full view of the card.


I hope you guys enjoyed!
Don't forget to stop by at Reverse Confetti Blog for more inspiration from the team and a chance to win :)


Thank you so much for stopping by :)