Other Pages

Friday, October 31, 2014

Winnie & Walter October Release - Day 4


Hello Everyone...today marks the Day 4th release preview of Winnie & Walter October release.
Remember all the new products will be available for purchase tonight 8pm (CST).

I really love this stamp set I used on the card its called Stampets: The Gift stamp set.


To begin the card I first stamped the box first, then mask the gift box and mask the gift bag, to make it look like its behind the gift box. The cute Chihuahua is stamped on a separate cardstock and fussy cut. I cut a slit on the top of the gift box where I inserted the Chihuahua in the box. Next, I added some white gel pen on the box to add the dots and 2 lines on the gift bag. I also fussy cut the tiny tag "for you" also included on the stamp set. The dog bone image is also from the set, but the sentiment is from the Winter Woodland stamp set.

I also added some shadows using Copic markers at the bottom of the gifts to ground it. Next, I added some ink splatters to finish off the card.


Here's the full view.


I hope you enjoyed!
Thank you so much for visiting :)

 For more inspirations and Giveaway please stop by at
Winnie and Walter Blog.
Remember all the new products will be available for purchase tonight 8pm (CST)


Have a Wonderful Week!


Thursday, October 30, 2014

Winnie & Walter October Release - Day 3


Hello Winnie & Walter fans, welcome back to our 3rd Day release preview.

For my project I am showcasing a simple card I made using the Happy Christmas stamp set. This card can easily be duplicated for the upcoming holiday. To begin I stamped the wreath image first then highlight it with olive copic marker. Next, I stamped the sentiment at the bottom from the card in black ink. Then, stamped the deer image inside of the wreath with gold embossing powder, just give it a gold effect when it hits the light.


Here's the full image.


For my second card I created a shaker card using the Cutaways (die-cut) from The Big, the Bold and the Merry in (winter) and the images are from Winter Woodland (pine cone & bough) & the sentiments ('tis the season) are from the Happy Christmas stamp set. I also use the Creative Screening Scenery: Classic Diagonal for the panel for the shaker.

For the sequins I used the Pretty Pink Posh in all sized in Sparkling Clear and Gold


Here's the full image.

I hope you enjoyed!
Thank you so much for stopping by!

For more inspirations and Giveaway please stop by at
Winnie and Walter Blog.


Have a Wonderful Week :)


Wednesday, October 29, 2014

Winnie & Walter October Release - Day 2


Hello Everyone we are back with day 2 of Winnie & Walter October release.
Today I am showcasing this awesome set called Winter Woodland many awesome images you can play with.


To begin my card I first used one of the upcoming Creative Screenings called Scenery: Big Bang Circle. I placed the creative screening on top of the white card base then smooshed the grey chalk ink on top to create the falling snow background. Next I die-cut the kraft cardstock slated using the Pretty Pink Posh Stitched Border 2 dies, I used the elegant stitched. Next, I splattered the kraft and some in the white using Mister Huey's in brown and October Afternoon sprinklers in paper doily (white). Then, I stamped all the images I am going to use on the white cardstock then fussy cut each one (birds, bough, and pine cones). The sentiment is also from the same set.


I hope you enjoyed!
Thank you so much for stopping by!

For more inspirations and Giveaway please stop by at
Winnie and Walter Blog.


Have a Wonderful Week :)


Tuesday, October 28, 2014

Winnie & Walter October Release - Day 1


Hello Everyone, its very exciting week for Winnie and Walter, they are releasing the new upcoming products for October 2014.


For my first project I used the new Gingerbread Man stamp set with the new Cutaways (more on this product on the 3rd day previews). I first gold embossed the sentiment from Gingerbread Man and added the long awaited Cutaways in "merry". Next, I distress the corners of the card panel in Wplus9 Flamingo dye ink and Sweet Nectar dye ink.  For my Gingerbread Man and cup of milk I white heat embossed first then watercolor it down. I then fussy cut the images once its dried and adhered on the card with foam dots for dimensions. For final touch I splattered it with October Afternoon Sprinklers in Paper Doily.


Here's the full image.


For my second project we are showcasing the new product line for Winnie and Walter called Creative Screenings these are the new stencils that will be available for purchase. For the background I used the Scenery: Triangled Creative Screenings I distress using Distress inks in Peacock Feather and Crushed Olive. Next, I die-cut the Cutaways from The Big, the Bold and the Merry (holiday) in black cardstock and adhered it at the middle of the cut space at the bottom. I also stamped the (sentiment happy) from the Winter Woodland stamp set which will be showcased tomorrow. I also included the fussy cut gold embossed deer, also from the Winter Woodland stamp set. Next, I added some Gold sequins from Pretty Pink Posh in 4mm & 6mm to finish off the card.


Here's the full card image.


I hope you enjoyed!

Thank you so much for stopping by!

For more inspirations and Giveaway please stop by at
Winnie and Walter Blog.


Have a Wonderful Week :)


WFC - Happy Birthday


Hello Everyone...I am sharing an easy to make watercolor card using Waffle Flower Crafts Calendar Numbers and Bowtiful stamp sets.

To begin my card I first stamped the numbers and sentiments with Versafine Black Onyx ink. This ink seems to work when I do watercolor. I let it wait for a few minutes (5 for me) sometimes I used a heat tool to dry. Next, I added my watercolor and added some splatters from the watercolor ink to finish the card.


Here's the full image.


I hope you enjoyed!


Thank you so much for stopping by!
Have a wonderful week :)


Monday, October 27, 2014

Wplus9 - May Your Days Be Merry & Bright

For Altenew post and giveaway please click HERE.
.........................................................................................................................................


Hello Everyone...I am just playing along with Fusion Card Challenge this week using one of the recent October 2014 release from Wplus9.


For this challenge I only used the sketch..
I used the cute elf and its coordinating sentiment from Wplus9 Merriest Wishes stamp set.

I die-cut some ovals using the spellbinder ovals and created three windows. One of the three I distressed it using PTI True Black ink, its not really black...when I use it for distressing. For some reason this ink usually gives this color, I kinda like it in a way.

Then, I colored the elf and fussy cut him and adhered him on the oval window as if he's looking out.
I really liked how Wplus9 made him...it gives me way to extend the use of this cute little guy.

To finish off the card I added some splatters and Pretty Pink Posh Sparkling Clear sequins.


Here's the the full image of the card.


I hope you guys enjoyed!
If you want to play you can click the link Fusion Card Challenge.

Thank you so much for stopping by :)
Have a Wonderful Week!!!


Altenew October Release Blog Hop!


Hello there, welcome to the Altenew Blog Hop! You're suppose to be coming from Agnieszka Malyszek's blog.  If not, you can click the Altenew Blog to start at the beginning of the hop, there's a lot of inspirations and prizes we don't want you to miss anything :).

Altenew is a relatively new stamp company that opened it's doors in April 2014. Today they are celebrating the release of their third collection of stamps. All the stamps that you will see here are available for purchase at the Altenew store and the Simon Says Stamp store.


To begin my card I first stamped the all sentiment stamp called Many Thanks, I did not remove the any stamp sentiment on the acrylic sheet it came with except one the biggest cursive thank you. I stamped the whole entire sheet with blank ink and stamped it on the card base. Then fill in the larger thank you, stamped it with versamark and gold embossed it. I then die-cut a kraft card panel using the spellbinders circle dies, I also created a circle border using the circle die and distress it lightly with Peacock Feather.

Next I stamped the flowers from Whimsical Flowers stamp set heat embossed the stamp outline with white embossing powder, fussy cut the flowers and leaves and adhered. To finish it off I splattered it with white and Classic tan Mister Huey's mist.


For my next card I stamped all the flowers and leaves from Peony Scrolls on a watercolor paper using white embossing powder, then watercolored. I fussy cut each image and adhered on the card base on kraft. Next, I adhered the die-cut panel on top using spellbinder circles and Pretty Pink Posh Stitched Border 2 dies "used the large stitched scalloped" also added some Sparkling Clear sequins. To finish off the card I stamped the sentiment from Painted Butterflies stamp set.


I hope you enjoyed!
Thank you so much for visiting


Your next hop will be at Yana Smakula's blog.
Have a Wonderful Day Hopping!!!


PRIZES ALERT
To celebrate this release, Altenew is giving away five stamp sets of choice to three lucky winners! The winners will be chosen from comments left on the Altenew blog.


There is more! I will choose a winner from comments left on this post and the prize will be two stamps sets of your choice.

You have until Friday October 31, 11:59 EST to leave your comments. You may enter up to two comments on each blog: 

  • Comment on the project, or the stamps.
  • Like us on Facebook

***The winners will be selected and announced on Saturday November 1 at 9:00 am EST.


.........................................................BLOG HOP LISTS..........................................................

                      Joni Andaya  - you are here


Friday, October 24, 2014

PPP & WW Blog Hop

For the N&T Release Please click Here
.........................................................................................................................


Hello Everyone...welcome to the Pretty Pink Posh and Winnie & Walter inspiration Blog Hop!
You should be coming from Heather Pulvirentil's blog, if not you can always start HERE or HERE :)


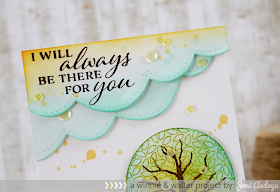
1. To begin my card I first die-cut my sorta cloud look using the new October release dies from Pretty Pink Posh Stitched Borders 2 Dies (large scallop). 2. I then distress the scallop die-cut using the Distress inks in Wild Honey and Peacock Feathers and added some ink splatters with the same colors mentions after diluting a little water on the acrylic block. 3. Next I stamped the sentiment from Winnie & Walter's A Tree For All Seasons stamp set and put the die-cut pieces aside.


 4. Moving on the card base of the card, I then distress the bottom of the card (distress ink in Crushed Olive) using the curved stitched die from Pretty Pink Posh Stitched Borders I Dies.  5. Next, I stamped the dog and cat image from the past Winnie & Walter release from This Awesome House stamp set, after stamping the tree image twice and adhered on top of the other A Tree For All Seasons. 6. The tiny bird on the tree branch is also from A Tree For All Seasons stamp set. 7. Then, I adhere all of the pieces together added some more splatter on the card base. 8. For the final touches couldn't help but add more Lemon Meringue 4mm/ 6mm Sequins from Pretty Pink Posh.


Here's the full card image.


I hope you guys enjoyed!
Your next stop is at the amazing Kelly Griglione blog.


.........................................Giveaway Alert.....................................
  • There are 2 prize packs up for grabs. Winners will be picked randomly along the blog hop by Winnie & Walter and Pretty Pink Posh. (Comments must be left by 11:59 PM PDT on 10/27/2014.) 


                            Joni Andaya...........You are here


Have a WONDERFUL day Hopping!!!!
Thank you for Stopping By.


Neat & Tangled October Release - Day 5


Hello Everyone ....welcome back to the 5th day previews of the new upcoming products from 

Neat & Tangled is releasing this adorable Tiny Triangle die...awesome right?
Ha! I've been waiting for this for so long.


For my first project I used again the Little Santa Girl.
I stamped and fussy cut her then adhered her on the top of the Tiny Triangle die.

I also gold embossed the banner fussy cut and adhered on the card.


For the final touch I added another holly, added some glossy accent for shine.
Here's the full card image.


For my second project I used another new stamp set called Very Merry


I really love the stars that's included on the set. I decided to stamped the stars on the white card base using white embossing powder and versafine. I then distressed it with Peackoc Feather and Wild Honey, the added some splatter of water.

Next, I die-cut the white cardstock panel and heat embossed the sentiment in silver  "May Your Holidays" around outside the circle. Then adhere the other sentiments that I stamped on a black cardstock using the white embossing powder and adhere on the bottom of the circle die to mimic the snow globe.


Here's the full image.


I hope you guys enjoyed.
For more inspirations and Giveaway please visit our


Remember all the new release are now available for purchase at the Neat & Tangled Store.
Thank you so much for visiting!
Have a Wonderful week :)


Thursday, October 23, 2014

Neat & Tangled October Release - Winter Trees - Day 4


Hello Everyone, welcome back to Neat & Tangled October Release.
Today we are showcasing the stamp made by our very own Miriam.
Winter Trees


For my project, I white heat embossed the tree image and watercolor. Really easy to showcase these trees. I added some falling snow using the Uni-ball broad white pen. The trees I added some green stickles for shine. The sentiment is part of the stamp set as well :).


I hope you guys enjoyed this simple card.

For more inspirations and Giveaway please visit our

Thank you so much for visiting!
Have a Wonderful week :)

Wednesday, October 22, 2014

Neat & Tangled October Release - Warm Wishes - Day 3


Everyone..today marks the 3rd day of Neat & Tangled release this October.
For something warm this upcoming seasons we are showcasing the new upcoming
stamp images called Warm Wishes. Really simple but with lots of punch :).


To begin my card I first cut a kraft panel same size as an A2 card and adhere on the white card base for thickness. I also cut and adhered another white panel on top of the kraft panel where I adhered the Maya black and ivory colored stripe ribbon for my card. Next, I stamped the sentiment and image on a white cardstock with Versamark ink and gold embossed it. I also added some gold embossing on the top and bottom of the panel to match the sentiment...hehehe gold for the holidays I say *-*. I then colored the cup image with red and brown Copic markers, I just have to be careful when coloring because it colored the gold embossed as well...I didn't really want that. To finish of the card I added some snowflakes from the recent preview Winter Wishes. The black dots are added just using sharpie pen :)


I hope you enjoyed!

For more inspirations and Giveaway please visit our

Thank you so much for visiting!
Have a Wonderful week :)


Tuesday, October 21, 2014

Neat & Tangled October Release - Little Santa Girl - Day 2


Hello Everyone we are back with Day 2 product reveal from Neat & Tangled.
We are showcasing this cute little girl from Little Santa Girl Stamp set, isn't she adorbs?


For my project I created a tag with her using the past released stamp set Santa's Tags

I first stamped the tag image from the Santa's Tags stamp set with Versafine ink in black, I also added some dots on the middle of the tag using gray Copic to represent snow. Next, I stamped the little girl from a separate white cardstock then colored her with Copic markers. Next, I fussy cut her image and adhere her on the tag with foam tape for dimension. Next, I stamped the tag image that's include with the girl, but only used the leaves and berries. I also colored the image with Copics, fussy cut and adhere with foam tape on the top corner of the tag.


Then, I added some Wink of Stella in Clear on the hat and the present that she's holding. Here's the look when it hits the light. Next, I also added the twine on top of the tag to finish it off.


Here's the full view of the card.


I hope you enjoyed!

For more inspirations and Giveaway please visit our
Neat & Tangled Blog.


Thank you so much for visiting!
Have a Wonderful week :)


Monday, October 20, 2014

Neat & Tangled October Release - Winter Wishes - Day 1


Hello Everyone... today marks the  first day of the Neat & Tangled October Release. For my project I am showcasing the new upcoming stamp set Winter Wishes.


To begin my project I first stamped the houses, trees, and snow images with Versamark ink and embossed it with gold embossing powder. Next, I distress the images with Distress ink in Stormy Sky and Peacock Feather. Then I got another white cardstock panel and cut the middle to create a window for my scene. I then added some dots of glossy accents and clear glitter to create the falling snow look. To finish off the card.... I stamped the sentiment "From Our Home To Yours" on a brown cardstock from Recollections using a Versamark ink and embossing it with white embossing powder to finish off the card.


Here's the full view of the card.


I hope you enjoyed!

For more inspirations and Giveaway please visit our
Neat & Tangled Blog.


Thank you so much for visiting!
Have a Wonderful week :)


Thursday, October 16, 2014

Waffle Flower Crafts - Thankful For You


Hello Everyone...I am just sharing some thank you cards using some of the new products from the Waffle Flower October release. I really love this new Flower Circles die set and the Holiday Label - Give Thanks Stamp set. Really easy to combined these two products, I cut the patterned paper first from October Afternoon to create a panel for my card. I then adhere another strip of patterned paper from Crate Paper at the bottom of the panel.

Next, I die cut some white cardstock using the Flower Circles die set, I stacked them together (I die-cut it five times) to make a sturdy look and feel. For the middle of the Flower Circles die, I stamped the images from the Holiday Label - Give Thanks Stamp set, then adhere at the middle of the panel. To finish off the card I added some Pretty Pink Posh Marshmallow is 6mm and the card is done.


Here's the full view of the card.


For this second card I also used the products from WFC October release 100% Love Stamp set, Tribal Thank Stamp set,  Holiday Label - Give Thanks Stamp set and, Give Thanks die set. Lastly I also added some Pretty Pink Posh Sparkling Clear Sequins.

To begin, I first cut my white cardstock panel a little smaller than an A2 card, then stamped the tree image at the bottom of the panel from Tribal Thank Stamp set. Then I cut the bottom of the panel jut a little strip and adhere on the card base. Next, I stamp the "Thank You" sentiment from 100% Love Stamp set adhere with dimensional foam tape. I added some gold embossed and die-cut leaves from  Holiday Label - Give Thanks Stamp set and, Give Thanks die set. To finish off the card I added the Sparkling Clear sequins from Pretty Pink Posh is all three sizes :)


Here's the full view of the card


I hope you enjoyed!

Thank you so much for stopping by.
Have a Wonderful almost kinda weekend.