Showing posts with label Winnie & Walter. Show all posts

Friday, October 30, 2015

Winnie & Walter - Previews Day 4


Hello Everyone! Welcome to the Day 4 Winnie & Walter Release Previews.

To begin my first card I adhered an old patterned paper on a white cardstock. Then watercolored a watercolor panel to create a background color and let it dry. Next I die-cut the scallop panel using the new Essentials: Noelle Cutaways.


Next, I stamped the house image and sentiment from the new Happiest of Holidays stamp set. Next I stamped the wreath using the new Merry & Bright stamp set. The bird & house are from the new Happiest of Holidays stamp set also was stamped on a separate watercolored paper, then watercolored each image then fussy cut.


Next, I put the pieces together and adhered each one with foam tape for dimensions. The red bow is from the Take a Bow Cutaways which was colored with Copics.

 Finally I added some Pretty Pink Posh Sparkling Clear  sequins to finish off the card.


For my next, card I first stamped the branch image from Happiest of Holidays stamp set. Then I watercolored a watercolor panel, once dry I adhered it on a card base. Then I added some gold watercolor gouache to give that interest.


Next, I stamped the bird and the house on a separate watercolored paper. The bow image is from the new Merry & Bright stamp set. Next I assembled the images on a panel and adhered them with foam tape.


Next, I stamped the sentiment "Happiest of Holidays" from Happiest of Holiday's stamp set on a separate white cardstock, gold embossed, fussy cut and adhered on the card with foam tape.

To finish off the card I added some Sparkling Clear sequins from Pretty Pink Posh.


I hope you enjoyed!
Today wraps up all the release previews.
All the products you've been seeing will be available today.
For more inspirations and giveaway please visit Winnie and Walter's Blog .


Thank you so much!
HAVE A WONDERFUL WEEKEND :)


Thursday, October 29, 2015

Winnie & Walter - Previews Day 3


Hello Everyone, Welcome back with Day 3 Winnie & Walter release Preview.

For my first card I used the new In Bloom: Hollie's Festive Floral stamp set. This set is really versatile you can use it for holidays and simply a flower card with lots of choices of flowers and leaves.


To begin, I first stamped the flower and leaves images on a card base then accentuate with Copics on the center of the flowers and the veins of the leaves. For the sentiment I die-cut the In Word: Friend Cutaway 4 times, colored the tip with Copics, adhered the die-cut pieces on top of the other to give dimension on the word "friend".

One of my favorite in this collection is this new pretty Take a Bow Cutaways that I used to create this yellow bow for the card.


I also added some Wink of Stella on the bow and the sentiment.
I also added some Pretty Pink Posh Sparkling Clear sequins to finish off the card.


For my next card I used the new Our Town stamp set and the pretty die-cut wreath called In Bloom: Paulina's Greenery Cutaways. I also used the new Essentials: Noelle Cutaways to create my scallop panel.

To begin I first adhered the scallop die-cut on the top of the Kraft card panel. Next, I die-cut the wreath from Paulina's Greenery two times using watercolored paper and for my third cut I used outlines wreath cutting in on a vellum paper. Next I adhered all three on top of the other the vellum die-cut on top.


Next, I added some Pretty Pink Posh Blue Lagoon sequins for added touch on the leaves. Next, I adhered the gold embossed house that I fussy cut from Our Town stamp set. Finally to finish off the card I added the sentiment from Happiest of Holidays with Evelin Designs which the team will showcase tomorrow.


I hope you guys enjoyed!


Thank you so much for stopping by.
For more inspiration and prizes please go to Winnie and Walter's Blog for details.


Have a Wonderful Week!


Wednesday, October 28, 2015

Winnie & Walter - Previews Day 2

Hello Everyone, Welcome back with Day 2 Winnie & Walter release Previews.

For  my first project I used the new Winnie & Walter Cover Model: The leaf Effect Cutaway to create my background panel. But behind the Cover Model is just a distressing using Tattered Rose ink and Wplus9 Last Leaf dye ink.


Next, to create my focal point I used the image from the new Comfort & Joy stamp set, gold heat embossed the deer image on a vellum paper and fussy cut. I also stamped the wreath image then fussy cut.  Next I assembled the pieces on the middle of the card using foam tape for dimension. For the wreath I also added some dots of gold Stickles for interest.

Finally I used the sentiment from the new Merry & Bright with Evelin Designs, stamped and fussy cut. this stamp set will be showcase on Friday.

I also added some Pretty Pink Posh Sparkling Clear sequins to finish the card.


To begin for my next card, I first watercolored the background and splattered it with gold ink using the Gouache from Windsor Newton.

Next, I die-cut the True Multifaceted Star Cutaways on a white cardstock and adhered on the watercolored panel.


Next, I die-cut the new In Word: Peace Cutaway with a glittered cardstock and adhered on the card. I also added the sentiment "jolly+merry+grateful" from the new Merry & Bright with Evelin Designs, white heat embossed on a black cardstock and adhered with foam tape to finish off the card.


I hope you guys enjoyed!


Thank you so much for stopping by.
For more inspiration and prizes please go to Winnie and Walter's Blog for details.

Have a Wonderful Week!


Tuesday, October 27, 2015

Winnie & Walter - Previews Day 1


Hello Everyone, Welcome to Day 1 Winnie & Walter release previews!
For my first card I used the new In Bloom Elsa's Flora stamp set.

To begin I first stamped the images using the largest bough on the set. Next I stamped the larger pine cone, and the pine cone was colored with Copic marker. Then I swipe the Hero Arts white Unicorn ink on the sides of the panel to mellow the color a bit.


Next I die-cut the big "joy" die using the new In a Word: Joy Cutaway 4 times to give that dimension after adhering the die-cut on top of each other. Next I colored the die-cut using the Hero Arts Ombre Ink in Lime to Forever Green. I also added some wink of stella clear glitter on the word Joy to give it sparkle.


For my second card I used the new In Bloom: Anna's Flora. I first stamped the sunflower image on a watercolored paper, and colored it using my watercolor palette. Once dry, I fussy cut the sunflowers and leaves.

Next I created my background using distress ink (Peacock Feather) and then splattered it with diluted Peacock Feather on the acrylic block to give that background some interest.


Here's just a closer look.


For the sentiment I used the In a Word: Thanks, I die-cut it 4 times and adhered it on top of another to give it dimensions.


For my last card I used the new In Bloom: Renee's Leaves stamp set. Lots of leaves that I love on this set. I created a simple card, I first stamped the leaves on my card panel in black ink.

Next I stamped the two larger leaves on a watercolored paper then fussy cut. Next I adhered the two leaves on the card panel, then added some twine to give that fall feel.


For the sentiment I die-cut the word "blessings" from the past Cutaways The Big, the Bold and Blessings I bent the die-cut a little to give that curve look on the card.

Then to finish off the card I used the new Pretty Pink Posh Clear Droplets in 6mm and 4mm.


I hope you enjoyed!

Thank you so much for stopping by.
For more inspiration and prizes please go to Winnie and Walter's Blog for details.

Have a Wonderful Week!


Wednesday, September 16, 2015

Winnie & Walter with Stamptember!


Hello Everyone, I hope you've been enjoying all the inspiration from
Simon Says Stamptember Event exclusives.

Today I want to share with you the Winnie & Walter's exclusive stamp set and Coordinating die set called In Bloom: Addie's GardenOh I really love this big gigantic flower :) 


To begin, I distressed the white card base with Distress Ink pad in Tattered Rose. Then I splattered it with Tattered Rose after smooshing the ink pad on the acrylic block, adding water and splattering it with paint brush. I also added some gold splatter from using the Gansai Tambi watercolor paint.


Next, I stamped the big flower on the vellum paper with Versamark ink and gold heat embossed. Same with the flower center and leaves. Then I adhered the pieces on the card base with clear foam tape to finish off the card.


I hope you guys enjoyed!
Thank you so much for stopping by!

Have a Wonderful week :)


Friday, May 29, 2015

Pinkfresh Studio May Embellishment Kit with Winnie & Walter


Hello Everyone, today the Winnie & Walter team is showcasing the PinkFresh Studio May Embellishment Kit.

 PFS  collaborated with W&W with this May Kit and we are so honored to be taking part with it.


For my first project I used the Doodle frame die and the Live life stamp set.


To begin, I stamped the diamond image from the Live life stamp set to create a background. Next, I watercolored some pieces of watercolor paper and die-cut the Doodle frame die and assembled them on the middle of the panel. 


I then white heat embossed the sentiment from the Live life stamp set on a black cardstock and adhered it on the middle with foam dot for dimension.

I then added some Pretty Pink Posh Sparkling Clear sequins to finish off this card.


For my second project I adhered a polka dots patterned paper first from Lawn Fawn. Next, I stamped the flowers on a watercolor paper using The Big, the Bold and Extras stamp set. Once its dried, I die-cut the Doodle frame die on the center of the flower panel I created.


Next, I adhered a clear acrylic  plastic at the back of the flower panel and adhered the frame on the center of the die-cut piece. I then added some Heart Sprinkles from the Kit and I also added some Lemon Drop sequins from Pretty Pink Posh.

Next, I added the "hello sunshine" epoxy stickers also from the kit to finish off the card.


Here's the full view of the whole entire kit :)


I hope you guys enjoyed!
Don't forget to visit Winnie & Walter's blog for they are Giving away the whole kit.


Thank you so much for stopping by!
Have a WONDERFUL Weekend :)


Saturday, May 2, 2015

Winnie & Walter and Pink Fresh Studio Collaboration - Color Challenge


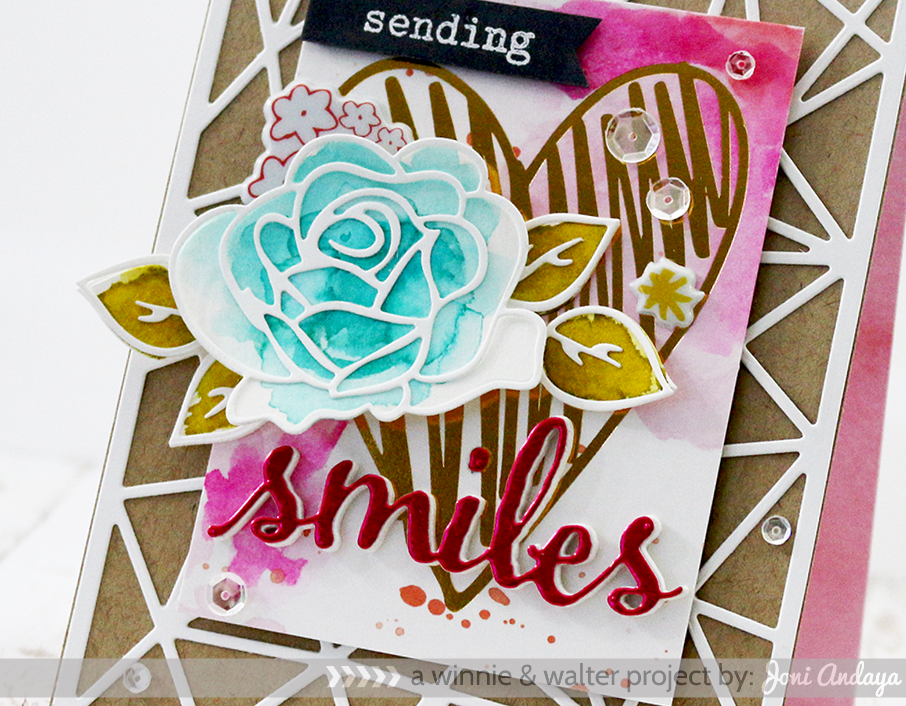
To begin my card I first die-cut W&W Cover Model: Multifaceted cutaways in white cardstock and adhere on top of the Kraft card base for my card. Next I added the Pink Fresh Studio Up In The Clouds Foil painted Watercolor Cards, I added some more (pink) watercolor on the right top and left bottom corner for added intensity of colors.


Next, I adhered the Winnie & Walter In Bloom: Maggie's Roses Cutaways (flower and leaves) that I watercolored. I also added the Pink Fresh Studio Up In The Clouds Foam Stickers for added touch.

Next, I die-cut the "smile" in pink foil from Winnie & Walter The Big, the Bold and Friends Cutaways. The "sending" sentiment from The Big, the Bold and Friends stamps set was white heat embossed on a Dark gray cardstock and finish off with Pretty Pink Posh Sparkling Clear sequins.


I hope you guys enjoyed!
Thank you so much for visiting :)

For more Inspiration please visit Pink Fresh Studio and Winnie & Walter.

Now its your turn to play :)
Happy Crafting!!!


Winnie & Walter and Pink Fresh Studio Collaboration - Card Sketch


Hello Everyone, welcome to the Winnie & Walter Collaboration with Pink Fresh Studio :)


To begin my card, I first cut the 12x12 patterned paper from Pink Fresh Up In The Clouds in Rainbow Dance in a size of an A2 card, then die-cut in the center to create a window for my shaker behind the "hi" die-cut from Winnie & Walter In a Word: Hi Cutaways.


Next, I added some sequins exclusive colors from W&W by PPP in 1st Birthday Bash sequins mix. Next, I die-cut the In a Word: Hi cutaways and added some gold rub-ons from Pink Fresh Studio also from the Up In The Clouds collection.

Next, I die-cut a word Friend cutaway from The Big, the Bold, and Friends cutaway in aqua cardtock and adhere at the bottom of the die-cut Hi.

I also added some Sparkling Clear cardstock from Pretty Pink Posh to finish off the card.


I hope you guys enjoyed

For more information please click here for Pink Fresh Studio
and Winnie & Walter.


GIVEAWAY!
Winnie & Walter is also giving away $25


Thank you so much for stopping by,
Have a WONDERFUL weekend :)


Thursday, April 30, 2015

Winnie & Walter - Day 3 Release Preview


Hello Everyone, Welcome back with the Day 3 Winnie & Walter Release previews.
Its all about In Bloom: Addie’s Garden, In Bloom: Maggie’s Roses Cutaways
The Big, the Bold and Extras Cutaways.


For my card I used the pretty flowers from In Bloom: Addie’s Garden stamp set.


To begin, I first stamped the flowers on the card and watercolored each one but not some much blending here, just put the colors in and let it dry. Once the flowers dried then I watercolored the background with more watercolor and then let it dry.


Next, I stamped the sentiment from The Big, the Bold and Comfort stamp sets and I also used the "comfort" The Big, the Bold and Comfort Cutaways.


For this card I used the In Bloom: Lola's Bouquet stamp set and the Essentials: Katherine Cutaways using the line of tiny dots die added at the bottom of the card.


I also added some Tangerine sequins from Pretty Pink Posh to finish off the card flat and cupped.


Below, I used the line dots die-cut from the Essentials: Katherine Cutaways.


I hope you enjoyed!

Thank you so much for stopping by!
For more Inspiration please visit Winnie & Walter's Blog.