Friday, August 29, 2014

Winnie & Walter - August Release

Hello Everyone.....
Tonight we are celebrating the AUGUST Release 2014 tour of the STARS!


I am sure you will love these new sets from Winnie & Walter so fun with lots of possibilities!

For this first project I used the upcoming new A TREE FOR ALL SEASONS

To begin I first cut my white cardstock with Pretty Pink Posh Stitched Borders I Dies 
I used the curved stitched die then white heat embossed on of the leaves from the stamp set and watercolor them. I also embossed some of the leaves on a different cardstock, fussy cut, then adhere with foam tape.
This set also comes with pretty sentiments for the seasons which you would love.

The sentiment "thankful FOR YOU"  is also fussy cut and adhere with foam tape for dimensions.
The silver dots you see on the card are from using the Sakura gel pen in clear, for some reason it turns out glittery silver in color ( I drew the dots on my own for added interest on the card ).


For final touches I added the Pretty Pink Posh sequins in Marshmallow 4mm & 6mm and finish it off.


For my second project is all about the "house" THIS AWESOME HOUSE is next.


To begin I first cut my card panel from a white cardstock, then distress it with Peacock feather distress ink using the Mama Elephant cloud die from Landscape Trio to create the background.
For the ground color on the panel was also distress using Frayed Burlap and Crushed Olive distress inks.

I then white heat embossed the house on the watercolor paper and watercolored it :).
Once the house is all dry I adhere with foam tape on the panel.  I also adhere the banner with clear foam tape. This banner is from the same set THIS AWESOME HOUSE with the sentiment also from the same set "hello neighbor". 
Oh.... the banner is heat embossed on vellum with gold embossing powder as well the sentiment.


The plants you see on the side of the house is also from the same set these are also watercolored, fussy cut, and adhere with foam tape. The little kitty on the stairs is also from the set, just stamped it with brown ink, fussy cut, and adhere with foam tape.


Here's the full card image.


For my last project is from the set MOONLIGHT this is for the upcoming halloween.
I created something that you can also use with this set even if you don't celebrate.

On this Moonlight set you will see two set of pumpkin images, the larger one I created a flower with it.....hehehe you can see below :).


I stamped the larger pumpkin to make it into a flower image with white embossing powder on watercolor paper and colored. The sequins are from Pretty Pink Posh in Sand 6mm (center of the flower) and in Marigold 4mm and 6mm. Once the flowers are dried I then fussy cut and adhere it with foam tape.

The stem of the flowers are hand drawn using the Distress Markers in Crushed Olive. The leaves are from the A TREE OF ALL SEASONS, I used the Crushed Olive distress maker to color the leaves and stamped on the panel.

Did some little splatter here and there and stamped the sentiment (birthday wishes) from the A TREE OF ALL SEASONS and I am done :)


Here's the full card image.


I hope you enjoyed all the projects with this release!


You have until 11:59 p.m. (central standard time) on September 1, 2014 to enter the Giveaway :)
Don't forget to stop by at Winnie & Walter's Blog for more inspirations and GIVEAWAY!!!


Thank you so much for stopping by :)
Have an AMAZING Weekend!


Winnie & Walter - Love Week - Sketch

Hello Everyone...
Today I am participating with Winnie & Walter Share the Love Week with Simon Says Stamp.


In this feature with are using a sketch made inspired by one on my teamie Gayatri :)
So pretty right?


For my card I used the Winnie & Walter The Big, the Bold and Seasons "summer" to match it with this cute stamps from Simon Says Stamp Ice Cream Dream stamp set.

To begin, I adhere the stripe red and cream patterned paper from October Afternoon on the card base. Next I cut a white cardstock for the panel a little bit smaller than my A2 card.
I then stamped the sentiments first, then stamped the ice cream images, the two ice cream on the left are masked and colored with copics.

The sentiment "summer" is gold embossed, fussy cut, and adhere with foam tape after all the stamping are done. I also added some splattering here and there.  To finish off the card I added some sequins from
Pretty Pink Posh in Sand 4mm and 6mm, and Sparkling Clear in 4mm, 6mm, and 8mm :)


Here's the full image.


I hope you enjoyed!


Don't forget to stop by at Winnie & Walter for more inspiration and Giveaway for the chance
to win the gift card :)


Thank you so much for visiting.
Have a WONDERFUL weekend!!!


Tuesday, August 26, 2014

Waffle Flower Crafts - A Gift 4U with Gift Card Holder


Hello Everyone..... this is my second post of the day :)
If you are looking for the Reverse Confetti August Color Challenge please click HERE.
.............................................................................................................................................................


Today I want to share with you how versatile the new Waffle Flower Crafts 

Surface – Tag Die – Santa Add-on


I was so desperately needing a card for a gift card when the light bulb came on.
Ha! Surface-Tag Die-Santa Add-on is just perfect for the gift card holder.
Please excuse my Ulta reward card...hehehe, already have to give the real gift card even before I got a chance to take all the step-by-step photos.


First, I cut a piece of white cardstock just a little bigger than my gift card (this where I will place the gift card when its done).
I then underline the top and bottom of my gift card on the white cardstock panel using the gift card as a guide, this will remind me the size of the gift card.


I then placed the speech bubble edge die just a little bit over the top of the pencil mark I drew, did the same way at the bottom.


This how it looks when its already been die-cut on both top and bottom.
Just remember to erase all the pencil marks :)


NOTE:  Once its all done, I try to slid the card on the side this will help remain the crisp look of the speech bubble edge that I die-cut to avoid bending the cut.


The pattern paper measures: 8 x 4 1/4
Then the fold measures: 3 1/4, 3 1/4, and 1 1/4


To decorate the outside of the gift card holder I used the santa's belt from the same die-cut Surface-Tag Die-Santa Add-on as a closure of the gift card holder.

I then added the sentiment "A Gift For You" from the A Homemade Christmas stamp set, I used a white embossing powder to make the sentiment pop out of the brown woodgrain patterned paper. The tree images are from the Riverside stamp set, these images are also heat embossed in green embossing powder (Recollections Embossing powder in Citron from Michaels).


I hope you enjoyed and make your own Gift Card Holder using 


All these sets are now available at
Waffle Flower Crafts Store.
Have a FABULOUS Week!!!


Reverse Confetti - August Color Challenge


Hello There....its time for Reverse Confetti August Color Challenge.


For my card I used the RC Tag Me, Too Confetti CutsDiagonal Stripe Pretty Panels Confetti Cuts, and Here We Go stamp set + Confetti Cuts.

To begin I splatter the card base with blue watercolor ink and let it dry. I then die-cut the tag from Tag Me, Too Confetti Cuts and distress the top part of the tag for the sky effect. Next, I die-cut the Diagonal Stripe Pretty Panels Confetti Cuts in red and adhere on the tag. Then I stamped the plane image from Here We Go on a white cardstock and die-cut ( the plane was stamped with Delicata Gold ink ).  The sentiment is from the same set Here We Go stamp set.


I hope you enjoyed!


Thank you so much for visiting me!
Have a Wonderful Day Creating :)


For more inspiration don't forget to stop by at the
Reverse Confetti Blog.


Saturday, August 23, 2014

Waffle Flower - Gift For You

Hello Everyone….
It’s a card share using Waffle Flower Crafts Starry Night,
A Homemade Christmas, and Loved stamp sets.

To begin my card I first cut the white panel smaller than an A2 card then stamped the “Gift For You” sentiment from A Homemade Christmas. I also added the dots and stars from Starry Night stamp set.  I just made sure I have a space at the middle of the panel to add the gifts and tree image (form into a gift cone) from A Homemade Christmas.
The bow is from the Loved stamp set and dies. The tree image and bow were adhere on the panel with foam tape. The whole panel was attached on the red panel size of the A2 card which was adhered on the white card base.


Here’s the full image.


I hope you enjoyed!

Thank you so much for stopping by!
Have a Wonderful Weekend J

Friday, August 22, 2014

PPP - August 2014 Cutting Edge Blog Hop!


Hello Everyone... very exciting day going on at Pretty Pink Posh.
CUTTING EDGE BLOG HOP!!!

Lots of Fabulous Sponsors don't forget to join us!


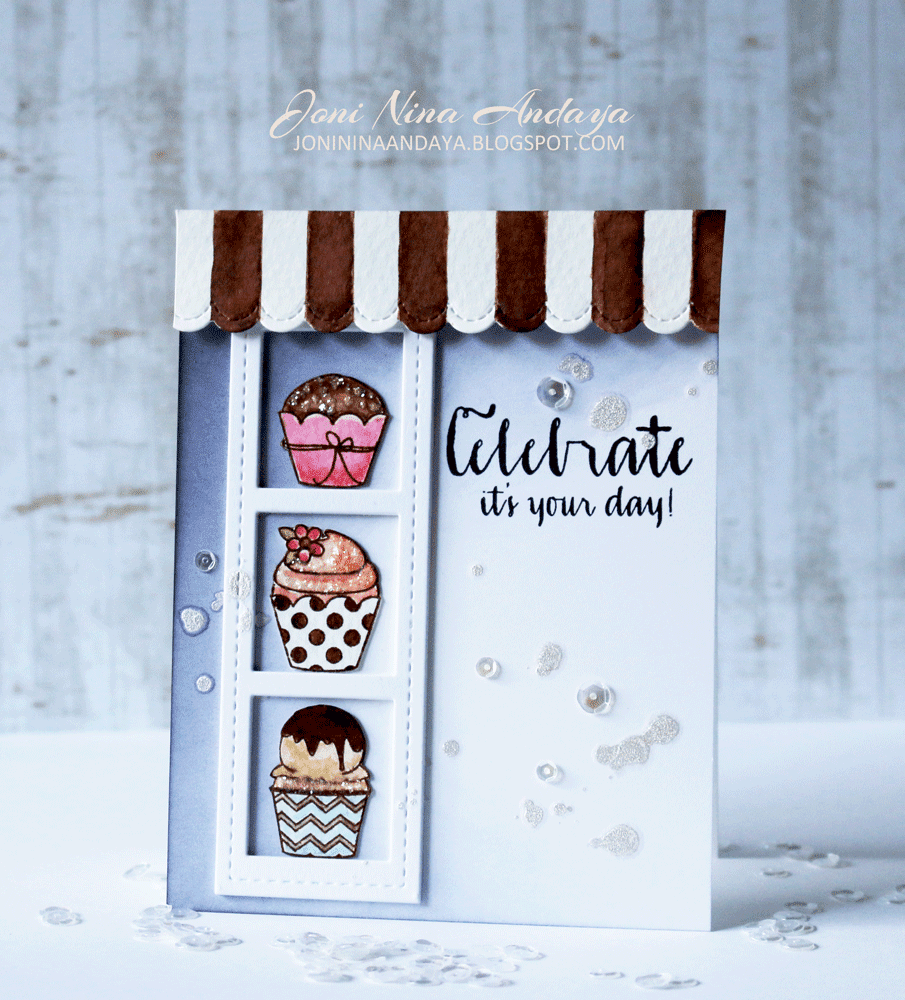
For my first card I used the Pretty Pink Posh Stitched Border 1 Dies and 
the recent release  Stitched Film Strip Die.


I first distress the card base using Distress ink pad in Black Soot to create the night look at the Cupcake store. I love the night look because it gives highlight on the images. I then added the  Stitched Film Strip Die to case the cupcakes from Wplus9 Sweet Treats like in the cupcake store :).  I also added the Scallop stitched border die from Stitched Border 1 Dies to create my awning. The awning is watercolored :).
To finish off the card I add some Pretty Pink Posh Sparkling Clear in 6mm & 4mm sequins and splatters from Studio Calico in Shine.


For the second card I used the circle die-cuts from Stitched Duo 2 Dies.

To begin my card I first adhere all those stitched circles from the Stitched Duo 2 Dies on the panel. Next, I colored some of the circles with copics and added some clear glitters from Martha Stewart to make those stitched circles like falling snow balls. I then added the Yeti from the Lawn Fawn Yeti, Set, Go stamp set.
I also added the tag and sentiment from Lawn Fawn Winter Gifts and die cut using Tag, You're it
I couldn't help it but added those cute stars from Pretty Pink Posh Nature Embellishment Kit and Sparkling Clear sequins in 6mm & 4mm to finish off my card.


I hope you enjoyed!

Don't forget to join us in the Hop!
Lots of great prices from our  Fabulous Sponsors.


You can find all the details at 


Thank you so much for stopping by!
Cannot wait to see what you create.


Friday, August 15, 2014

Wplus9 - August Released - Lucky Stars & A Winner!!!


Hello Everyone...
I want to share with you the LUCKY STARS stamp set.
The sentiments on this set is perfect for our awesome friends :)

This is my version of my starry night in the sky.
I first white heat embossed the sentiment, then use the True Black ink from PTI to distress the sentiment to create my dark sky. I was hoping it would be grayish black but instead it turned out blackish violet. I couldn't find my Distress Ink pad in Black Soot :(, probably lost it in our move .....*sigh* :(.

Although the longer I stare at it, I think the colors are OK this way too.


I hope you can see the shimmer in this view, its really intense shimmer using
Sakura GELLY ROLL in Clear Star.

I added the shimmer pen after the water splatter I did on the panel. I simply colored the splatter marks for
added shine here in there.....love <3


Another look :)


Here's the full view of the card.


I hope you guys enjoyed my starry night take.


Thank you so much for stopping by to view my Wplus9 August 2014 Released!
I also thank you guys for all your Super SWEET comments on my blog :)


And the WINNER of the Fresh Cut Containers set is....................

Shona Chambers


Congratulations Shona!

Shona, please email me at jonininaandaya@gmail.com  so we can get these sent to you.
You have until Sunday August 17th to email me.


Thank you so much everyone!


Thursday, August 14, 2014

Wplus9 - August Released - Flora & Fauna 2


Hello Everyone...
Today is all about FLORA & FAUNA 2 stamps sets and dies.
This set is just beautiful :) really love the hummingbirds and butterflies on this set, simply perfect for watercoloring those gorgeous images.

I also used the Hand Lettered Thanks for the sentiment.


I stamped the images on the card base with a very light ink, antique linen. Then watercolor it, really have lots of inspiration on Pinterest looking for humming bird colors. They are so beautiful in really life, Dawn really captured designing this gorgeous birds.

Once the watercoloring is done on the panel. I then watercolor some of the images on a separate watercolor paper then fussy cut and adhere on the panel for dimension.

I also added some sequins from Pretty Pink Posh in Marigold in 4mm and 6mm.


Another close-up


Here's the full view of the card.


To begin my second card, I stamped the sentiment first then stamped the flowers close on the sentiment. This will act as a guide before adhering the thanks die-cut.


The look of the thanks die-cut once its adhere on the card front. It gives that pretty effect that the sentiment looked as if its part of the card base. The Hand Lettered Thanks die was die-cut 4 times and adhere with glue to give that effect.


The butterflies are watercolored as well.


Here's the full view.


I hope you enjoyed!
Thank you so much for stopping by

Have WONDERFUL day :)