Saturday, May 30, 2015

Get Sketchy Challenge #1 - WINNER!!!

Hello Everyone I just want to say thank you for everyone who participated on our very first Get Sketchy Challenge. You guys did so wonderful on incorporating the sketch. Just in the know: our next Get Sketchy Challenge will be this coming July 8th, 2015.  Without further ado the winner of our first Challenge is Lin!  Congratulations Lin!!!


Please email me back so we can get your $20 Wplus9 Store Credit that you can use how every you wish :)


Thank you so much again Everyone!
Until next time :)

Have a WONDERFUL weekend.


Friday, May 29, 2015

Pinkfresh Studio May Embellishment Kit with Winnie & Walter


Hello Everyone, today the Winnie & Walter team is showcasing the PinkFresh Studio May Embellishment Kit.

 PFS  collaborated with W&W with this May Kit and we are so honored to be taking part with it.


For my first project I used the Doodle frame die and the Live life stamp set.


To begin, I stamped the diamond image from the Live life stamp set to create a background. Next, I watercolored some pieces of watercolor paper and die-cut the Doodle frame die and assembled them on the middle of the panel. 


I then white heat embossed the sentiment from the Live life stamp set on a black cardstock and adhered it on the middle with foam dot for dimension.

I then added some Pretty Pink Posh Sparkling Clear sequins to finish off this card.


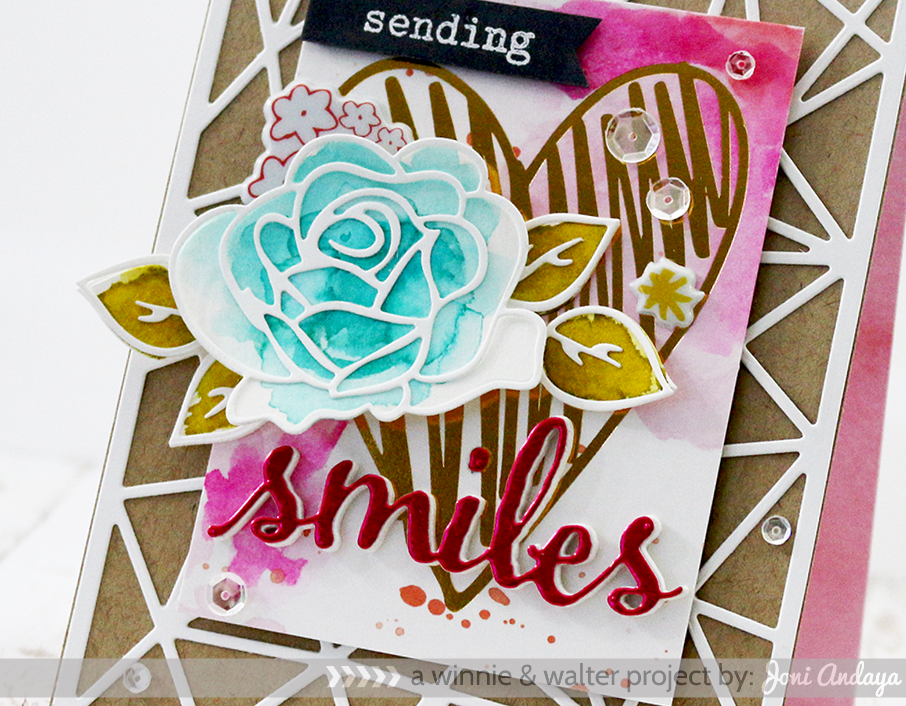
For my second project I adhered a polka dots patterned paper first from Lawn Fawn. Next, I stamped the flowers on a watercolor paper using The Big, the Bold and Extras stamp set. Once its dried, I die-cut the Doodle frame die on the center of the flower panel I created.


Next, I adhered a clear acrylic  plastic at the back of the flower panel and adhered the frame on the center of the die-cut piece. I then added some Heart Sprinkles from the Kit and I also added some Lemon Drop sequins from Pretty Pink Posh.

Next, I added the "hello sunshine" epoxy stickers also from the kit to finish off the card.


Here's the full view of the whole entire kit :)


I hope you guys enjoyed!
Don't forget to visit Winnie & Walter's blog for they are Giving away the whole kit.


Thank you so much for stopping by!
Have a WONDERFUL Weekend :)


Thursday, May 28, 2015

MFTs - Tickled Pink


Hello Everyone, I am back with my second day Guesting for My Favorite Things blog.
Today I am showcasing the LLD Tickled Pink stamp set and Die-namics LLD Flamingos.


To begin my card I first watercolor the watercolor paper in shades of pink and die-cut them using the Die-namics LLD Flamingos once the watercolor paper dried. I then  assembled them in line and added some Stickles on their feathers for sparkles.


I added the sentiment from ..........  after white embossing it on a black cardstock and adhered it on strip of patterned paper from My Mind's Eye Market Street in Ashbury Heights. Then added some Pretty Pink Posh Sparkling Clear sequins to finish off the card.


For my second card I first watercolor half of panel in yellow and once it dries I adhered it on the white card base. Then I watercolor color 2 panels with blue watercolor paint and light green on the other. Once the watercolor paper dried and I cut the pieces using the Die-namics Cross-Stitch Oval STAX and Die-namics Grassy Fields.


Next, I assembled the pieces on top of the card base and adhere the watercolored flamingos at the center of the Oval panel with the layered grass at the bottom.


Next, I used the gray Copic marker and colored a strip of white cardstock, let it dry and stamped the sentiment from the LLD Tickled Pink stamp set. Then, cut a banner shape adhered on the bottom of the card with foam tape for dimension.

Finally finish off the card with Pretty Pink Posh Sparkling Clear Sequins.


I hope you enjoyed!

Thank you so much for stopping by.
Have a Gorgeous Week :)


Wednesday, May 27, 2015

MFTs - Green Pastures and Perfect Harmony


Hello Everyone, I am so excited to be guest designing at My Favorite Things blog today.
I am showcasing their new release Green Pastures and Perfect Harmony stamp and Coordinating die-cuts.

To begin I die-cut the Die-namics Mini Chicken Wire on a white cardstock and adhered using a Mono Tombow Multi glue it on a white A2 card base.


Next, I distressed the white cardstock panels in sections using post-it. Next I die-cut the distressed panel with the new Die-namics Cross-Stitch Rectangle STAX using the largest rectangle first. Then die-cut each section like the one you see below using the Die-namics Cross-Stitch Rectangle STAX   .


I also used the Die-namics Cross-Stitch Oval STAX where the Green Pasture girl stands to give contrast on the colored die-cut panel. The Green Pasture girl was watercolored and fussy cut and adhered on the Coordinated die-cut piece with foam tape for dimension.


Here's the close up of all the pieces. The sentiment "Howdy" is also from the the Green Pastures stamp set, which where white heat embossed on a kraft cardstock. I added some sequins from Pretty Pink Posh Sparkling Clear, Lemon Drop, and Pink Blush to finish off the card.


For the next card, I cut  a chevron patterned paper and adhered it on the white card base. Next, I cut another panel of white cardstock and distressed it with Distress ink pad. After distressing I added some drop of water using my paint brush.


Once the panel is dry, I added some lines using a black pen for interest on the panel to tie the colors with the chevron card base. Then I added the "Happy Birthday toooo yoooou" sentiment also from the same set from Perfect Harmony  stamp set.


Next, I die-cut some vellum using the Die-namics Star STAX, to add softness to the background. The Perfect Harmony girl is also watercolored and fussy cut. I also added some Stickles on her flower clip and dress for a little sparkle.

Finally I added some Pretty Pink Posh sequins in Bermuda Blue, Lavender Moon, Sparkling Clear, and Marshmallow to finish off the card.


I hope you guys enjoyed!

Thank you so much for stopping by :)
Have Wonderful Week!!!


Monday, May 25, 2015

WPlus9 - I thought of you...


Hello Everyone, I want to share this pink bird I colored using Copic markers. This cute bird that Dawn hand drawn to create into stamps is really wonderful using any type of color media. You know I've been stuck into watercolor lately, just trying to practice using Copics again...feels that I am getting rusty with it now.

I was looking on Pinterest getting some inspiration on different color birds and I saw this pink one. 
This is how I came to Copic color this bird in pink :)


To begin my card I first stamped the bird image from Wplus9 New Day on a white cardstock and colored it with Copic markers in pink, grey, and yellow. I then added some light aqua on the side of the pink bird to accentuate. Next, I added the die-cut window from the Holiday Apertures die and adhered it on the kraft card base.

The sentiment "I thought of you" was from the Heartfelt Mix stamp set.


I hope you enjoyed!


Thank you so much for stopping by :)
Have a WONDERFUL Day!


Monday, May 18, 2015

Wplus9 - Background die-cut

Hello Everyone, I was experimenting with Wplus9 dies, creating a background die-cut from it. In this project I used the "rug" die from Wplus9 Smart Kitty Coordinating dies to create my background panel for my card. Of course there are tons for dies we could use for this type of project :)


To begin my card I first die-cut the A2 panel with "rug" die from Smart Kitty Coordinating dies. Then I used the scallop stitched from Sunshine Layers die to add a design on the die-cut panel.


Next, I distressed the white cardstock card base with Wplus9 ink pad in Beanstalk dye ink, Little Piggy, and Miami Spice to create a colored background. Then I added some splatters using the New Silver Lining Spray Mist, I added a tad of water on the acrylic block to dilute some of the colors to make it a tad lighter, and use my paint brush tool to splatter on the front of the card.


The sentiment I used was also from the Smart Kitty stamp set, I white embossed it on a black cardstock, then adhered on the panel with foam tape for dimension.


Next, I watercolored the kitty, rose, stem/leaves, and books, and die-cut each one with its coordinating dies and adhered on the card with foam tape. Then,  I added some PPP Sparkling Clear 8mm sequins to finish off the card.


I hope you guys enjoyed!

Have a WONDERFUL Week
Thank you so much for stopping by :)


Thursday, May 14, 2015

Pretty Pink Posh - May Release Blog Hop!


Hello Everyone, Welcome to the Pretty Pink Posh 2015 May Blog Hop.
You should have arrived from Yoonsun's blog.

There's a lot of products are being showcased right now we hope you enjoy every stop :).


For my first project I used the (double stitched die) from Stitched Borders 3 dies and the (banner and the round die) from Stitched Banner Duo 2 dies. I also added the new Gorgeous sequins mix this month called Enchanted Garden Sequins Mix in 4mm and 6mm.


First I die-cut the gold and black washi on a piece of cardstock using the double stitched die from the Stitched Borders 3 dies and adhered on the side of my card base. Next, I adhered the flower panel that I watercolored. Then adhere the banner from the Stitched Banner Duo 2 dies.


Next, I added the circle die-cut that I watercolored from the Stitched Banner Duo 2 dies to matched the color scheme :) and adhered it on top of the banner. The "Beyoutiful"sentiment die were from the Ellen Hutson Spring 2015 released called Beyoutiful. and the gold bow was die-cut from the old released from My Favorite Things Die-namics Dainty Bows.

To finish of the card I added some of the sequins mix from Enchanted Garden Sequins Mix in 4mm and 6mm.


For this second card, I used the new pretty scallop die from the Stitched Borders 3 dies to create some clouds for the scene :). Before adhering scallop die-cut they were distressed first using the Peackock Feather from Ranger then adhered with foam tape.


Once the clouds "scallop" were adhered. I then adhered the balloon (the string were just hand drawn) from the Essentials by Ellen Wish Big stamp set after coloring it with copic markers. Then adhered some gorgeous Iridescent sequins in Strawberry Burst 6mm, Pink Blush, Pink Peonies, Lime Sorbet,  and Large Gold Confetti Stars


The top panel of the card front were distressed in Peacock Feather and the bottom of the card were distressed in Crushed Olive by Ranger. Then I added the PPP Picket Fence die at bottom of the card panel and added the hippo, the bird from the Essentials by Ellen in Wish Big stamp set. 

The hippo and bird were colored with copics but for the hippo I also added some white dots using the white gel pen to define his looks :). I also used the new green Iridescent sequins in Peridot Mist which is really pretty in real life. A gorgeous addition to make your grass add a little sparkle :).

The sentiment were also from the same set Wish Big stamp set.


I hope  you guys enjoyed!


Giveaway Alert:
There are 2 $25 Gift Certificate up for grabs. Winners will be picked Randomly along the blog hop.
Comments must be left by 11:59 pm on May 18, 20115.
Winners will be announced on the PPP blog.


For more Inspiration and increase your chance to win
here are the lists of the Team :)


Pretty Pink Posh blog
Yoonsun Hur
Joni Andaya
Lisa Elton
Yuki Yoshioka
Gayatri Murali
Nicole Gavaldon
Amy Kolling
Nichol Magouirk
Laura Sterckx


Thank you so much for stopping by.
Have an AWESOME day hoppin'


Friday, May 8, 2015

Wplus9 Sketch Challenge #1 Starts Today!


Hello Everyone, if you have not heard Wplus9 will be having a new Sketch Challenge
which starts today May 8th and will end on May 29th 11:55 pm EST.

You are also eligible to win a $20 Store Credit from the Wplus9 Online Store, which will be an awesome idea for the upcoming June 2015 Wplus9 release.


Here's a sneak of my project at the Wplus9 Blog :)


Cannot wait to see your wonderful creations and visit you on your blogs.
See you there :)


................................................................................................................................
*The Comment section of this post has been disabled Thank you*


Thursday, May 7, 2015

Essentials by Ellen Spring 2015 Release Blog Hop - WINNER!


CONGRATULATIONS!!!
Paulette.

Ellen Hutson will be in contact with you soon.

Thank you so much Everyone for your sweet comments and loving support :)
Have a Wonderful week.


Wednesday, May 6, 2015

New Wplus9 Sketch Challenge


Hello Everyone, there will be a Brand New Sketch Challenge for Wplus9 lovers at Wplus9 Blog.
The Challenge will start this coming May 8th.

As long as you use one products from Wplus9 you are entitled to win and be counted for a
$20 credit at the Wplus9 Store.

The winner will be announced on May 30th on Wplus9 Blog. 


To give you ahead start here's the sketch below.


Thank you so much for stopping by!
See you there...


Virginia's View Challenge #14


Hello Everyone I am honored to be here Guest Designing with Lovely Virginia :) The Challenge for this month is all about layered and dimensions. For my project I used Winnie & Walter Essentials: Audrey Cutaways and start layering it with the ginormous "hi" from In a Word: Hi Cutaways

To begin I first die-cut the largest frame from the Essentials: Audrey Cutaways  and watercolored it. Then die-cut the big "hi" and watercolor some more, lots of playing how to make my flower look like flowers. If you have not tried watercolor yet, you got to give it a go, because its really relaxing and there's no wrong in doing it, its up to you how you want your image or images to look like :) plus its just plain fun.


I then die-cut 4 more "hi" and adhered it on top of each other to create dimension on my card. Next, I added some vellum flowers that's been heat embossed in gold, then fussy cut using the flower images that I designed for Winnie & Walter In Bloom: Lola's Bouquet.

To finish off the card I added a strip of dark grey cardstock and heat embossed the sentiment "beautiful" from The Big, the Bold and Friends.


I hope you guys enjoyed!
If you have not played yet please click the link below


Thank you so much for stopping by :)


Tuesday, May 5, 2015

In Bloom: Lola's Boutique - Winner!!!


 Michelle please e-mail me so I can send your stamp set to you.

Thank you so much for participating on this giveaway
Have an AWESOME week.


Saturday, May 2, 2015

Winnie & Walter and Pink Fresh Studio Collaboration - Color Challenge


To begin my card I first die-cut W&W Cover Model: Multifaceted cutaways in white cardstock and adhere on top of the Kraft card base for my card. Next I added the Pink Fresh Studio Up In The Clouds Foil painted Watercolor Cards, I added some more (pink) watercolor on the right top and left bottom corner for added intensity of colors.


Next, I adhered the Winnie & Walter In Bloom: Maggie's Roses Cutaways (flower and leaves) that I watercolored. I also added the Pink Fresh Studio Up In The Clouds Foam Stickers for added touch.

Next, I die-cut the "smile" in pink foil from Winnie & Walter The Big, the Bold and Friends Cutaways. The "sending" sentiment from The Big, the Bold and Friends stamps set was white heat embossed on a Dark gray cardstock and finish off with Pretty Pink Posh Sparkling Clear sequins.


I hope you guys enjoyed!
Thank you so much for visiting :)

For more Inspiration please visit Pink Fresh Studio and Winnie & Walter.

Now its your turn to play :)
Happy Crafting!!!