Wednesday, August 13, 2014

Wplus9 - August Released - Papel Picado

Notes: 
If you are looking for RC post for B-Day Hop for Jen Please click HERE.
If you are looking for the NEW Wplus9 Fresh Cut Containers GIVEAWAY please click HERE.
...........................................................................................................................................................


Hello Everyone...today I am showcasing the New Wplus9 August 2014 Released 
stamp set and Papel Picado dies.

This set is simply one of my favorite....I don't have anything like it :) I really love that the little images from the Fresh Cut Containers worked perfectly.


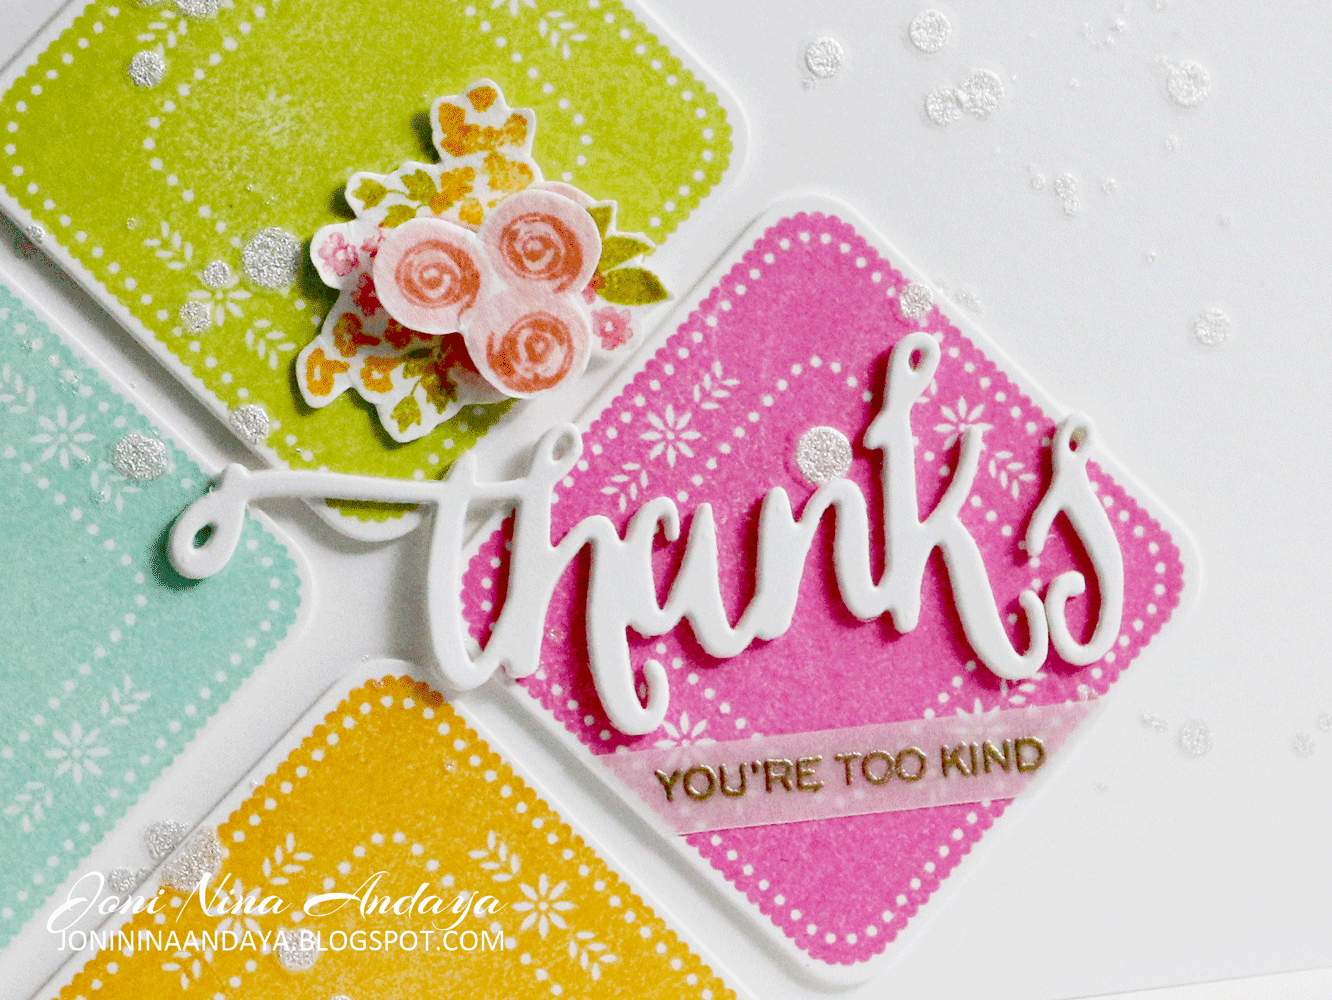
1. To begin, I stamped the largest papel picado image on different white cardstock in four different colors.
2. After stamping I die-cut each one of the colored images. I die-cut more blank papel picado squares 4 for each square then adhere on the card. I did not use foam tape on the squares this time. I adhere the blank square die-cut behind the colored stamped images and adhere on the card for elevation. It made the die-cuts part of the card base this way :).


3. I then splatter it with Studio Calico Shine.


4. Next, I stamped the Fresh Cut Containers flower images on a separate cardstock and fussy cut. The swirly flower images also stamped on a separate white cardstock, fussy cut and adhere with foam tape.
5. For the Thanks die from Hand Lettered Thanks, I die-cut the sentiment 4 times and adhere with Tombo Mono Multi Glue, I did this because the die-cut is very slim and foam tape will not work as easily.
6. The "You're Too Kind" is also from the Hand Lettered Thanks stamp set. Gold embossed on vellum and adhere on one of the papel squares.


Here's the look of the full card.


For my second project I couldn't help but make some banners using
Papel Picado and Fresh Cut Containers.


1. To begin, I first stamped the papel picado images on the watercolor paper. 
2. Once its done, I then stamped some of the flowers from Fresh Cut Containers and watercolor the images.
I just added very little water on the water brush just to move some of the water from the images to get that watercolor look. 
3. I then stamped the swirly flower image from the Fresh Cut Containers, fussy cut, and adhere with foam tape for dimension.


4. I also added some splattering using the leftover watercolor from my acrylic block.
5. For finishing touch I added a kraft scallop border on top of the card from Scallop Spellbinder square die.
6. I also added some sequins from Pretty Pink Posh in Marigold, Sparkling Clear, and Marshmallow.
7. The sentiment is from Strictly Sentiments 5, I colored the clear stamp with Distress Marker in Vintage Photo before stamping it on the card for a watercolor look.


Here's the full view of the card.


I hope you enjoyed!

If you have not comment on the Fresh Cut Container GIVEAWAY just click HERE.


Thank you so much for stopping by.
Have a Gorgeous Day :)


Happy Birthday Jen!


A few of the Reverse Confetti Crew and 'Fetti Friends are thrilled at the chance to surprise Jen with a celebratory hop in her honor and share birthday inspiration using Reverse Confetti!

The Candles 'n Confetti Birthday Hop started over at Stacey's blog and you should've made your way here by way of Leigh Penner's blog.  If not you can always star at Stacey's blog.


For my birthday card I used the RC products: 
 Circles ‘n Scallops Confetti Cuts.
Petals ‘n Posies
Beautiful Banners
Petals ‘n Posies Confetti Cuts
Beautiful Banners Confetti Cuts


I first created my watercolor background by smooshing the ink pad on the heat mat and smooshing the watercolor paper and heat drying it.
I then die-cut the flowers and leaves from Petals ‘n Posies Confetti Cuts , then watercolor them and stamped the center of the flower from Petals ‘n Posies
I then added the die-cut scallop circle from Circles ‘n Scallops Confetti Cuts.
Next, stamped the image from Beautiful Banners and die-cut. The sentiment is also from Beautiful Banners stamp set.

To finish of the card I added some Pretty Pink Posh sequins in MarigoldMarshmallow, Pink Blush, and Pink Peonies.


Here's the full view of the card.


In the honor of Jen's Birthday all your order TODAY from the RC Store is 20% off.


Last, but certainly not least...stop by and visit the birthday girl!

Now, it's time to hop over to  Jessica Fick 's blog.


Just a Reminder Reverse Confetti is Joining Pretty Pink Posh for the
CUTTING EDGE BLOG HOP on AUGUST 22th.
Lots of prices!!!
Don't forget to join us :)


Thanks for sharing in the birthday fun today!
Have a WONDERFUL Day Hopping :)


Monday, August 11, 2014

Wplus9 - August Released - Fresh Cut Containers


Hello there.....I hope you guys are ready for more Wplus9 projects :)
Today is my official day of showcasing projects using the
New Wplus9 August 2014 released!
Please pardon me for being delayed because of all the moving we did here in California.
Still lots to fix but just taking it one day at a time now :)


Without further ado..I will start showcasing
the other installment from the new Fresh Cut line of stamps.
FRESH CUT CONTAINERS
This stamps will give you endless possibilities combining with your other Fresh Cut stamp sets.


For my first project I combined the New August Released Fresh Cut Containers with 
More Fresh CutsFor the sentiment I use the New August released Hand Lettered Thanks.

1. To begin I used a white card panel then stamped some of the flower images from both sets.
2. When its all done I cut a piece of the vellum and stamped the sentiment in versamark ink and heat emboss with gold embossing powder.


Flower images I used from the both stamp sets.


3. I added the yellow seam binding to finish off the card.


Here's the full card image.


The products I used on my second project are Fresh Cut Containers and Strictly Sentiments 5.

For this project couldn't help but do some watercoloring on the images.

1. To begin, I cut a watercolor panel and stamped the sentiment "Celebrate it's your day!" from the top.
2. Next, I started my watercoloring by stamping the smaller container using a distress marker just colored the line of the image but not the whole image. 
3. I then masked the smaller container and stamped the watering by coloring the line of the image but not the whole image. This will help with the coloring since I added my own color. Dawn has a cool technique here on how she watercolored using Fresh Cuts, just in case you want to see HERE.


4. In this watercolor project I used distress markers, after coloring the stamp then I stamped it on the watercolor panel. I added some little water on the brush to help activate the watercoloring effects on the paper.

Its easier to use the distress markers because, you can selectively color some part of the stamp image but not all, this will give you more control on your color.

5. Once the images are dry, I then cut the watercolor image and adhere on the card with foam tape for dimension.


Here's the full image.


For my third and last project I used the Fresh Cut Containers and the Hand Lettered Thanks for the sentiment.

1. To begin.....


2. Once the images are done, then I added the sentiment.
3. For the last final touch I added the Foliage Frame die...I really love how this turned out.


Another look with the watering can.


Here's the look of the big container with flowers.


I hope you guys enjoyed!

Just leave me a comment
for your chance to win your own set of the Fresh Cut Containers stamp and die sets.
You have until August 14th at 11:59 EST to leave some comments.

I will announce the winner on August 15th.


Thank you so much for stopping by!
See you tomorrow for more Wplus9 Goodness!!!
Have a Wonderful Week :)